How to Find Frozen Pipes
When the temperature drops, frozen pipes often become a common issue in homes. The winter charm can quickly turn into a problem for homeowners when water pipes face sub-zero conditions, risking freezing and potential bursting. Dealing with the aftermath of frozen water pipes can be quite a task, and it can also cost a lot of money. This emphasizes the need to quickly figure out and fix the issue.
For effective solutions, seeking professional help for frozen pipe repairRepair is the act of fixing or restoring damaged property, m... More and water damage restoration is strongly recommended.
Frozen Pipes are More than Inconvenient
Frozen pipes can pose an inconvenience by disrupting your home’s water supply, making it challenging for water to flow through. Additionally, they can result in property damage. When temperatures plummet, the water inside pipes can freeze, causing it to expand. If the expansion creates enough pressure, it may leadLead is a heavy metal that can be toxic to humans, especiall... More to a burst pipe, causing not only pipe damage but also water spreading throughout your home, resulting in water damage.
It’s important to note that frozen pipes don’t automatically guarantee burst pipes and property damage—they have the potential to burst. Thawing frozen pipes promptly can prevent these issues. However, to address the problem, you first need to locate the frozen pipes.
How to Find Frozen Pipes ?
The initial step is to begin the search for frozen pipes. Here are effective steps to guide you through the process:
Check Faucets
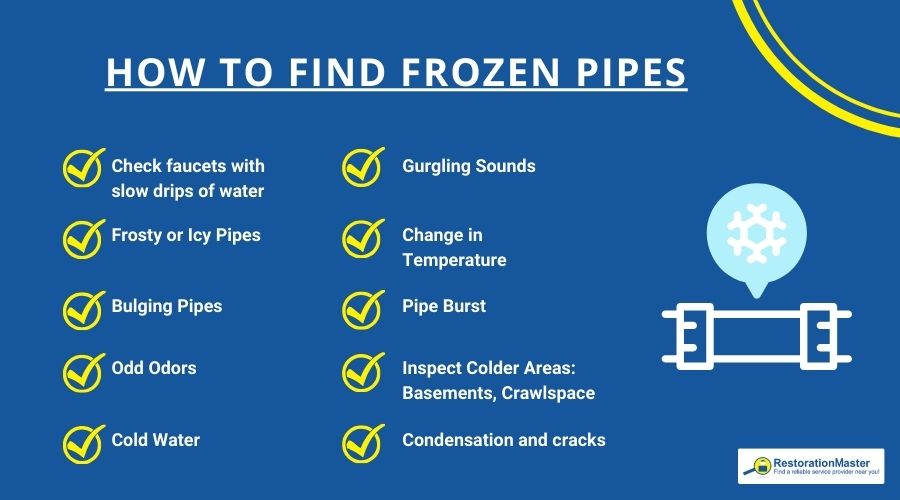
Start by looking at your faucets. If you see just a tiny stream of water or none at all when you turn them on, it could mean you’ve got a frozen pipe. Begin with the faucets farthest from where your water comes in, as they’re more likely to freeze because they’re farther from the warmth of the water source.
Which Pipes are Vulnerable to Freezing?
There are some pipes in your home or building that are more likely to freeze than others. Because of this, you should pay closer attention to these areas during the winter and take the necessary precautions to prevent them from freezing. These are also places to consider looking if your property does have a frozen pipe.
- Pipes in Attics and Basements: Pipes that are located in attics and basements don’t get heated as well as pipes in other areas of your property. Because of this, they’re more prone to freezing, especially if these areas are used regularly. To prevent this, insulate the pipes thoroughly.
- Pipes Along Exterior Walls: Pipes that are located along exterior walls are not only closer to the direct cold from outside, but they often lack proper insulationInsulation is a material used in buildings to reduce the tra... More, too. Knowing this, you need to provide more insulationInsulation is a material used in buildings to reduce the tra... More for these pipes to make them less vulnerable.
Spotting Signs of Frozen Pipes
Frozen pipes could show signs like a damp surface or tiny cracks. Keep an eye out for small puddles under a pipe, indicating collected condensation. Below are the some possible signs to look out for:
- Frosty or Icy Pipes: If you notice frost or ice on any pipes, then this is a surefire sign that the pipes have frozen and need to be addressed promptly.
- Bulging Pipes: If you notice a bulge in your pipes, this can mean it has frozen. Ice may have formed and expanded, creating a bulge in the pipe. This is particularly concerning because of the pressure the ice is placing on the pipe, meaning it may burst if not addressed properly.
- Odd Odors: When water cannot properly travel through pipes and drain to their destined location, then they’ll back up the pipes. In such cases, this can leadLead is a heavy metal that can be toxic to humans, especiall... More to strange smells, as the odorAn odor is a smell, often detectable by the human nose, whic... More will only be able to travel back up.
- Cold Water: If the water flowing from your faucet remains exceptionally cold without warming up, it might indicate the presence of an ice blockage.
- Gurgling Sounds: If you hear “gurgling” sounds or water-like bubbling when you switch on your heating, it may be a sign that your pipes are frozen.
- Change in Temperature: When the outdoor temperature falls below 38 degrees Fahrenheit, water has the potential to freeze. Since temperatures typically drop to their lowest point at night, it’s especially important to be vigilant during these hours.
- Water Damage: The abrupt rupture of a pipe, leading to a messy situation, could be a symptom of frozen pipes.
Inspect Cold Areas
In winter, certain parts of your home are more likely to get really chilly, which can leadLead is a heavy metal that can be toxic to humans, especiall... More to pipes freezing. Watch out for places like crawlspaces, basements, and exterior walls—they tend to lack good insulationInsulation is a material used in buildings to reduce the tra... More. Also, keep an eye on attics and any unheated rooms, like garages, since pipes in these spots might be at risk too. Outdoor faucets are especially vulnerable. To avoid freezing, make sure to insulate these areas, seal up any drafts, and use stuff like pipe insulationInsulation is a material used in buildings to reduce the tra... More sleeves or heat tape.
How to Thaw Frozen Pipes?
Thawing frozen pipes becomes a necessity during winter to prevent water damages that could compromise the integrity of your home. The time required for thawing pipes is approximately 30 minutes, but this period can fluctuate depending on factors like weather conditions, the duration of pipe freezing, and the pipe’s specific location. Here are some safe and effective ways to unfreeze pipes.
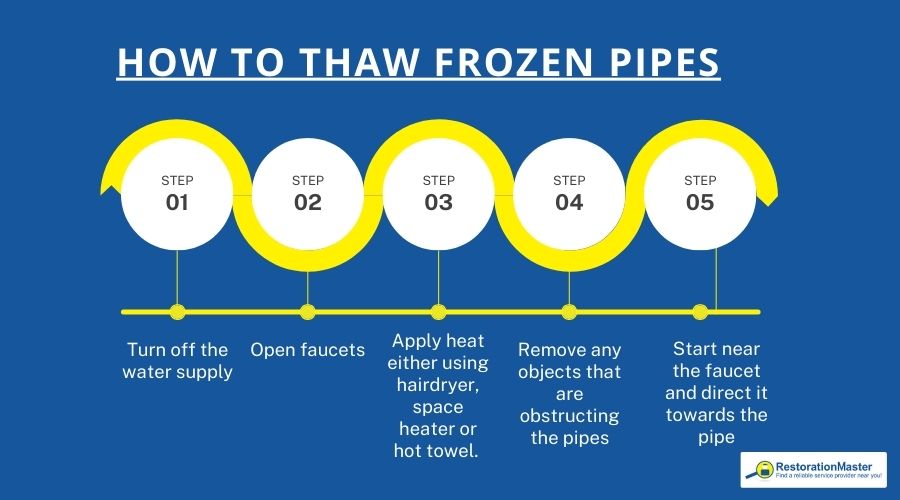
- Turn off the Water Supply: Begin by locating the main water shut-off valve and turning it off. This step prevents water from exacerbating the issue as you work on thawing the frozen pipe.
- Open Faucets: To release pressure and facilitate the thawing process, open the affected faucet(s). This allows water to escape as the pipe gradually thaws.
- Apply Heat: Choose a safe heat source to gently thaw the frozen pipe. Consider using methods such as:
- Hair Dryer: Direct warm air along the length of the frozen section.
- Hot Towels or Rags: Wrap them soaked in hot water around the frozen pipe.
- Heat Lamp: Position an infrared or heat lamp near the affected area.
- Electric Heating PadThe pad is the cushion or underlayment beneath carpet that p... More: Wrap it securely around the pipe.
- Space Heater: Safely place it in the vicinity, maintaining a suitable distance from flammable materials.
- Expose to Warmer Air: If the frozen pipe is in an enclosed space, open doors and remove any obstacles to allow warmer air to circulate around the pipe.
- Start Near the Faucet: Begin applying heat at the end of the pipe closest to the faucet. This approach helps relieve pressure and facilitates the release of water as the ice melts.
- Check for Leaks: Once thawed, turn on the water supply and carefully check for any leaks. If leaks are detected, turn off the water again and address them before fully restoring water flow.
Remember, the use of a naked flame or blowtorch is strongly discouraged due to the risk of pipe damage and fire hazards. If uncertain or unable to manage the situation, seek professional assistance.
Frozen Water Pipes Causing Water Damage
When water pipes freeze, they can leadLead is a heavy metal that can be toxic to humans, especiall... More to water damage when they thaw. As the frozen water expands, it can create cracks in the pipes. When the ice melts, these cracks may result in leaks, causing water damage in the area. Additionally, the moisture from burst pipes can create conditions for moldMold is a type of fungus that grows in damp or humid conditi... More and mildewMildew is a type of fungus that grows on damp surfaces, typi... More growth, posing health risks and adding to potential structural and property damage. The consequences of frozen pipes go beyond plumbing, affecting insulationInsulation is a material used in buildings to reduce the tra... More, drywall, flooring, and personal items. It’s important to address thawing frozen pipes promptly to prevent and minimize water damage to both the plumbing system and the property.
Call Professionals for Water Damage Repair and Restoration
In the event that a frozen pipe bursts in your home or building, seek professional help from a water damage restoration professional right away. The pipe burst will have spread water throughout your property, and the longer the water lingers, the more property damage it can cause. Lingering water and moisture can also encourage moldMold is a type of fungus that grows in damp or humid conditi... More growth.
With immediate help, the damage can be limited. Professionals will tend to the property and water damage, performing cleanup, water extraction, and property restorationRestoration is the process of returning a property to its pr... More.

