


How to Repair a Water-Damaged Ceiling
 Regardless of the water’s source, water damage cases are considered emergencies that require prompt action. The excess water will become absorbed by any porousPorous describes a material that contains small openings or ... More building materials in your property, including drywall and furniture. This absorptionAbsorption is the process by which a material takes in or so... More then makes it easy for the water to spread to new areas of your property, thus worsening the damage.
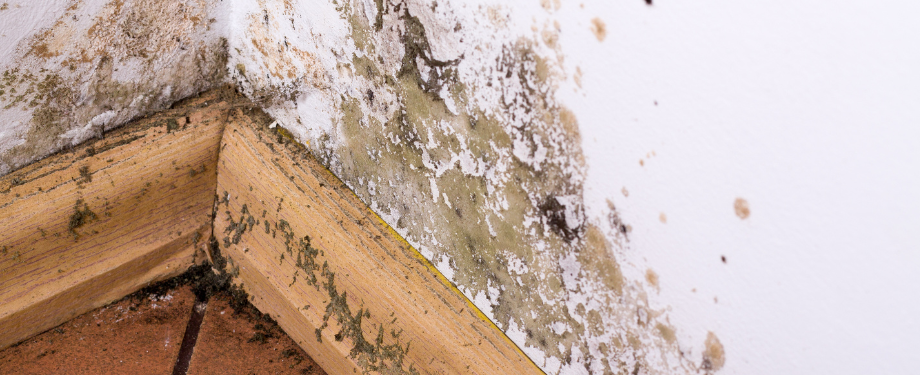
Furthermore, the more water that materials absorb, the less stable they will be. For example, a water-damaged wall that continues to take in more water will eventually deteriorate and suffer structural damage. The presence of excess water can also leadLead is a heavy metal that can be toxic to humans, especiall... More to moldMold is a type of fungus that grows in damp or humid conditi... More growth.
Repairing a Water-Damaged Ceiling
If you’re wondering how to repairRepair is the act of fixing or restoring damaged property, m... More a water damaged ceiling by yourself, acting quickly is key to prevent further structural damage or moldMold is a type of fungus that grows in damp or humid conditi... More. Failing to do so will threaten the structure’s integrity and people’s safety. Knowing this, you need to act immediately to prevent further damage.
Follow these DIY water damage ceiling repairRepair is the act of fixing or restoring damaged property, m... More steps to fix stains, sagging drywall, or leaks without hiring a contractor.
1. Stop the Water Source

In any water damage situation, the first thing you need to do before you can make repairs is to address the water source. This is important to prevent any further water damage. If you can’t find the source of a ceiling leak, the damage may worsen over time, leading to moldMold is a type of fungus that grows in damp or humid conditi... More and expensive repairs. Any repairs you make will then become useless.
To locate the source, you might need to remove the damaged drywall. Since water can spread, the source may be far from the damaged ceiling area. So once you find it, make any repairs or replacements needed to stop the water.
2. Dry the Affected Areas
Once the water source has been addressed, the water-damaged ceiling can then be dried.
First, place down a tarp to protect the floor and any furniture in the room from water and debris. Then, gather materials you can use to dry the ceiling, including fans and towels. Use fans and dehumidifiers to dry out walls and ceilings after floodingFlooding is the overflow or accumulation of water in areas t... More or roof leaks to avoid hidden moisture and moldMold is a type of fungus that grows in damp or humid conditi... More.
If water is still dripping after you’ve dried the ceiling, you can be sure it is still too saturated and requires further dryingDrying is the process of removing moisture from materials, s... More. You might need to cut out the sections that are still wet so you can dry it.
If the ceiling’s drywall is bulging, puncture it to release the water. But first place a bucket beneath the swollen area to catch any water.
3. Remove the Damaged Sections
 Before you do any more work, make sure to wear protective gear, including safety goggles and a face mask.
If the water-damaged ceiling is peeling or bulging, if you haven’t done so already, scrape those parts off. Other damaged sections, such as those with water stains, should be removed as well.
If the drywall has stains but has not sustained structural damage, you can salvage it by cutting out only the affected areas. Use a keyhole saw to cut out the damaged section into the shape of a rectangle or square. Then you can easily replace the part with a drywall patch later.
4. Repair the Ceiling
Using sandpaper, smooth down any ridges, bumps, and rough areas. Fill small holes with joint compound, let it dry, and then use more sandpaper to smooth it out.
For sections where you cut out the drywall, measure the hole. Then cut a new piece of drywall out to fill the hole, but make sure it is 2 inches wider and longer than the hole. Use a utility knife to safely cut away the bulging drywall and begin replacing drywall on a water damaged ceiling. Make sure to cut only the affected area to keep costs low and avoid replacing undamaged drywall unnecessarily. Smooth down ridges and seams using sandpaper to prep the ceiling for primer and paint after patching water damage.
5. Prime and Paint the Ceiling
When you are done with repairs, open windows to provide proper ventilationVentilation is the process of exchanging or circulating air ... More for the priming and painting process. Once repairs are complete, prime and paint the ceiling using mold-resistant products to prevent future water damage. Once dry, you may repaint the ceiling.
Although the entire ceiling may not have been harmed, it is best to prime and repaint the whole ceiling to ensure even coverage.
Call for Water Damage Restoration
Because water damage is considered an emergency, immediate action is important. In some cases, DIY ceiling repairRepair is the act of fixing or restoring damaged property, m... More after water damage may not be enough—especially when the damage is extensive or the source is unknown. Whether the job is too much for you, or you are unequipped to take care of a water-damaged ceiling yourself, you can hire professional help for water damage repairs and restoration services.
Hiring a water damage restorationWater damage restoration is the professional process of clea... More company can help if you’re unsure how to handle the ceiling leak, moldMold is a type of fungus that grows in damp or humid conditi... More concerns, or insurance claims. No matter what caused the damage, professional technicians will fix the water source, remove excess water and moisture, dry affected areas, and make the necessary repairs. If the water has led to moldMold is a type of fungus that grows in damp or humid conditi... More growth, professionals will handle its removal, too.
With help from a professional water damage restoration service, your water-damaged property will be repaired and safe to return to.
About Vince Sandri
Vince Sandri is a content writer and blogger with more than 12 years of experience. His expertise is in creating content related to disaster restorationRestoration is the process of returning a property to its pr... More, including information about preventing and reacting to natural disasters like floodingFlooding is the overflow or accumulation of water in areas t... More, water damage, fire and smoke damage, moldMold is a type of fungus that grows in damp or humid conditi... More growth, storm damage and more.
Vince has been the main contributor to RestorationMasterFinder.com since 2014. Over that time, he has written numerous service pages and blogs for disaster restorationRestoration is the process of returning a property to its pr... More providers featured on RestorationMasterFinder.com. Vince has done extensive research and covered a wide range of topics relating to disaster restorationRestoration is the process of returning a property to its pr... More to help homeowners, business owners, and property managers better protect their property. He understands the problems that disasters like floodingFlooding is the overflow or accumulation of water in areas t... More, fire, smoke, and moldMold is a type of fungus that grows in damp or humid conditi... More can cause as well as the best ways to respond to these issues to limit the damage.
Vince completed his Bachelor of Arts degree at Aurora University and his master’s degree at DePaul University. He has been writing SEO website pages, blogs, and press releases since 2012. Vince is also a musician and can be seen playing in the Chicago, IL area.