How to Fix a Leaking Toilet
While a leaking toilet can cause problems for everyone in the home, it’s not the most complicated problem to fix. As long as you can identify the problem and find the right component at the hardware store, you should have a working toilet again in as little as a few hours. If not, consult with a professional plumber; it may be more expensive, but at least you will have the peace of mind knowing that the problem will be fixed.
Finding Water Damage
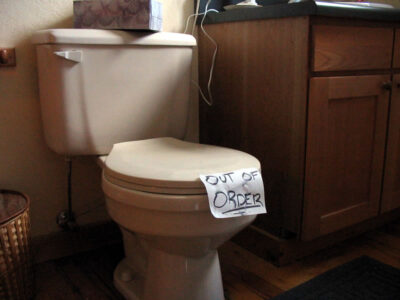 Toilets pump about 2-3 gallons each minute. And when there is a leak, water can easily spread throughout the floor, seep into the building materials, and leak through the floor below! When finding a mess such as this, don’t hesitate to call a water damage restoration professional.
Fixing the leak is one thing, but addressing water damage is another. When calling a restorationRestoration is the process of returning a property to its pr... More contractor for water damage cleanup, they will arrive within 2 hours of your first call with all extraction and dryingDrying is the process of removing moisture from materials, s... More equipment needed to return the building structureStructure refers to the framework or components of a buildin... More to its original condition. Then you can be sure that the leak is repaired and all water and bacteria are removed from the affected areas.
Steps for Fixing A Leaking Toilet
As long as it is safe to do and there isn’t water pooled around the toilet, follow these steps on how identify and fix the leak.
Inspect the Inlet Valve and Float
Start with taking the lid off the tank and inspecting the inside. If the water level has risen above the overflow tube, it means that the inlet valve on the ballcock or float is the problem.
How it works: When the water level rises, the float rises as well and signals the inlet valve to switch off the flow of water. But if it doesn’t work properly, the water continues to flow past the overflow tube and into the bowl.
Inspecting the inlet valve: First flush the toilet, and when the water rises in the tank, carefully lift the rod holding the float and listen for the water to stop. But if it doesn’t, the leak is caused by the float.
Adjusting the Float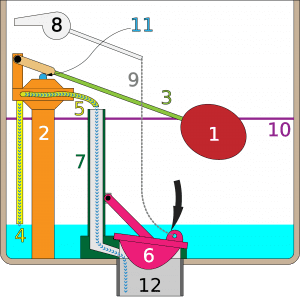
To check whether or not your float needs adjusting or replacing, carefully adjust the screw at the top of the ballcock to adjust the level of the float. If you are able to reduce the level to which water rises in the tank, the float only needs adjusting. But if not, it will need replacing.
How it works: When the float has a hole, it is too close to the water and will never rise to the required level to set off the inlet valve. However, both the float and rod are easy and inexpensive to replace.
Cut Off the Leak: Turn Off the Water
In the opposite situation in which the inlet valve doesn’t stop the flow of water, the ballcock is the problem. This problem will be a little more involved because the whole assembly will need to be replaced. Here’s how to do it.
After you have turned off the water to the inlet valve, flush the toilet again while holding the handle to remove the majority of water in the tank. Then soak up the rest of the water with a spongeA sponge is a porous material used to absorb liquids or clea... More. Make sure to wear gloves for this part.
Problem with Ballcock: Replacing the Assembly
To remove the assembly, start with removing the supply line behind the toilet that connects to the bottom of the ballcock. You will need slip-joint pliers to take off the nut on the supply line that secures the ballcock to the tank.
After pushing up from the bottom, pull out the assembly and switch it out with the new one. Then thread and screw on the replacement nut below the tank to reconnect the supply line. Make sure not to make the nut to tight or it could crack the tank.
Lastly, attach the new refill tube inside the tank and turn the water back on at the shutoff valve.
Testing the Flapper
If the problem is not with the float, inlet valve, or ballcock, you may have a faulty flapper. You will see that water is still leaking into the bowl while the water level in the tank is still below the overflow tube.
Test the flapper: To see if this is the problem, first turn off the water at the shutoff valve, then look to see if the water level in the tank goes down. If you notice a significant drop after 15 minutes – bingo. You found the problem. Either the chain is too tight or there is a hole in the flapper itself.
Replacing the Flapper
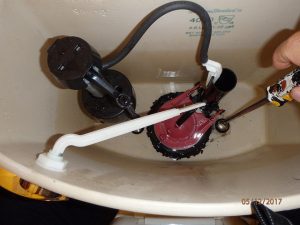 To replace the flapper, simply drain the tank by turning off the shutoff valve, flush the toilet, and hold down the handle. It’s ok if there is a little water left in the tank.
Remove any debris from the flapper seat with an old but clean washcloth and inspect for splits or cracks.
Then check the flapper itself to ensure it’s not torn and fits snuggly against the seat. If you find any damage, simply pull it out and replace it with a new one. You can do this by inserting it onto the hinges at the bottom of the overflow tube.
Extra Help: Water Damage Cleanup
That’s it! Unlike other appliances and plumbing, there’s not much to a toilet, making this DIY project a simple task. On the other hand, it’s not something to be put off as the water will continue to leak onto the floor, into the walls, and even penetrate through the ceiling of the floor below. If you don’t want to deal with the problem yourself or still can’t find the problem, don’t hesitate to call a licensed plumber. You may be stuck with a bill but at least the damage is no longer spreading.
While most leaks aren’t hard to spot since we use toilets everyday, many problematic situations occur in vacant homes. With an old structureStructure refers to the framework or components of a buildin... More and plumbing, these problems often go unnoticed for weeks and even months, finding water damage in multiple areas of the property. This will require professional water extraction and cleaning equipment.
Restoration companies are also available 24/7 to help with these emergencies. Known for restoring building structures from all kinds of damage, you can trust these professionals to have the job done effectively and efficiently. Don’t hesitate to give them call during any water damage emergency.

